A Guide to Skin Matching Prim Breasts

Hey musers,

The post we have to day has been put together by Madeea. It is in fact part of the older Full Breast manual before we went to the web version for ease of updating information. While the pictures are all based on the Full Breasts the instructions and advice are useful for matching any prim breasts or any attachment really. I have included the intructions in the images in text below it for easier translation via web tools for those who do not speak English natively.page 11
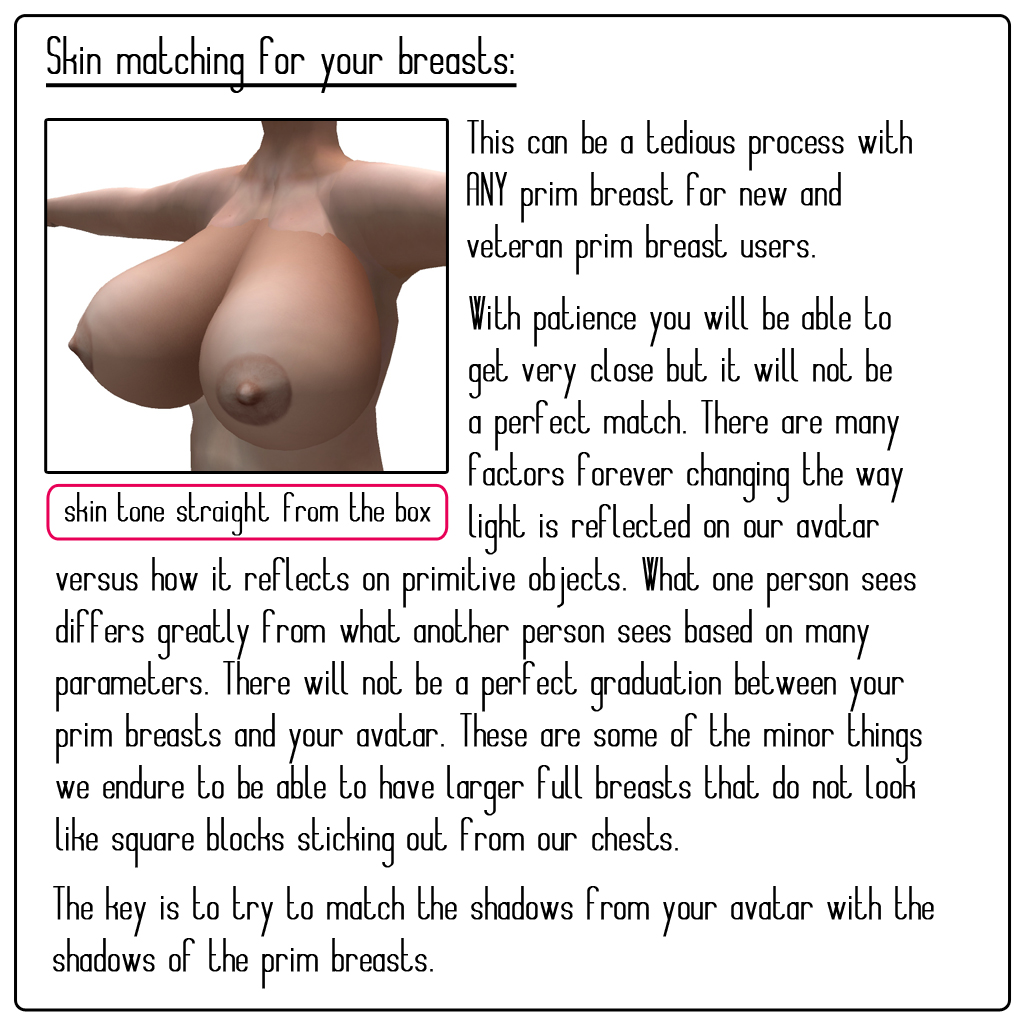
Skin matching for your breasts: This can be a tedious process with any prim breast for new and veteran prim breast users. (skin tone shown as it comes out of the box not yet altered) With patience you will be able to get very close but it will not be a perfect match. There are many factors forever changing the way light is reflected on our avatar versus how it reflects on primitive objects. (like the breasts) What one person sees differs greatly from what another person sees based on many parameters. (such as graphics settings) There will not be a perfect graduation between your prim breast and your avatar. These are some of the minor things we endure to be able to have larger full breasts that do not look like square blocks sticking out from our chests. (for more help on managing that line see Skye’s post on smoothing the transition.)

The key is to try to match the shadows from your avatar with the shadows of the prim breasts.page 12
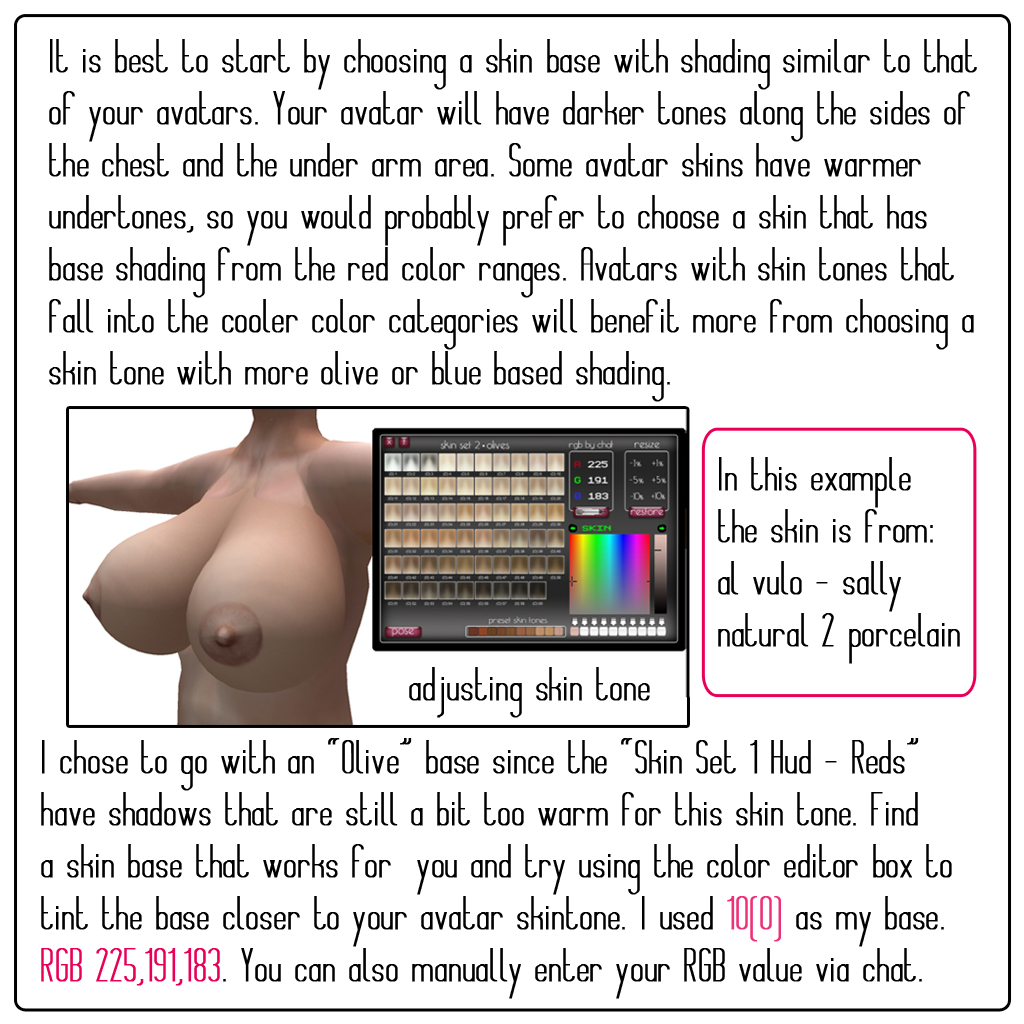
It is best to start by choosing a skin base with shading similar to that of your avatars. Your avatar will have darker tones along the sides of the chest and the under arm area. Some avatar skins have warmer undertones, so you would probably prefer to choose a skin that has base shading from the red color ranges. Avatars with skin tones that fall into the cooler color categories will benefit more from choosing a skin tone with more olive or blue base shading. (in this example the skin is from Al Vulo – Sally natural 2 porcelain) I chose to go with an “Olive” base since the “Skin Set 1 Hud – Reds” have shadows that are still a bit too warm for this skin tone. Find a skin base that works for you and try using the color editor box to tint the base closer to your avatar skintone. I used 10(0) as my base. RGB 225,191,183. You can also manually enter your RGB value via chat with the microphone.

page 13  
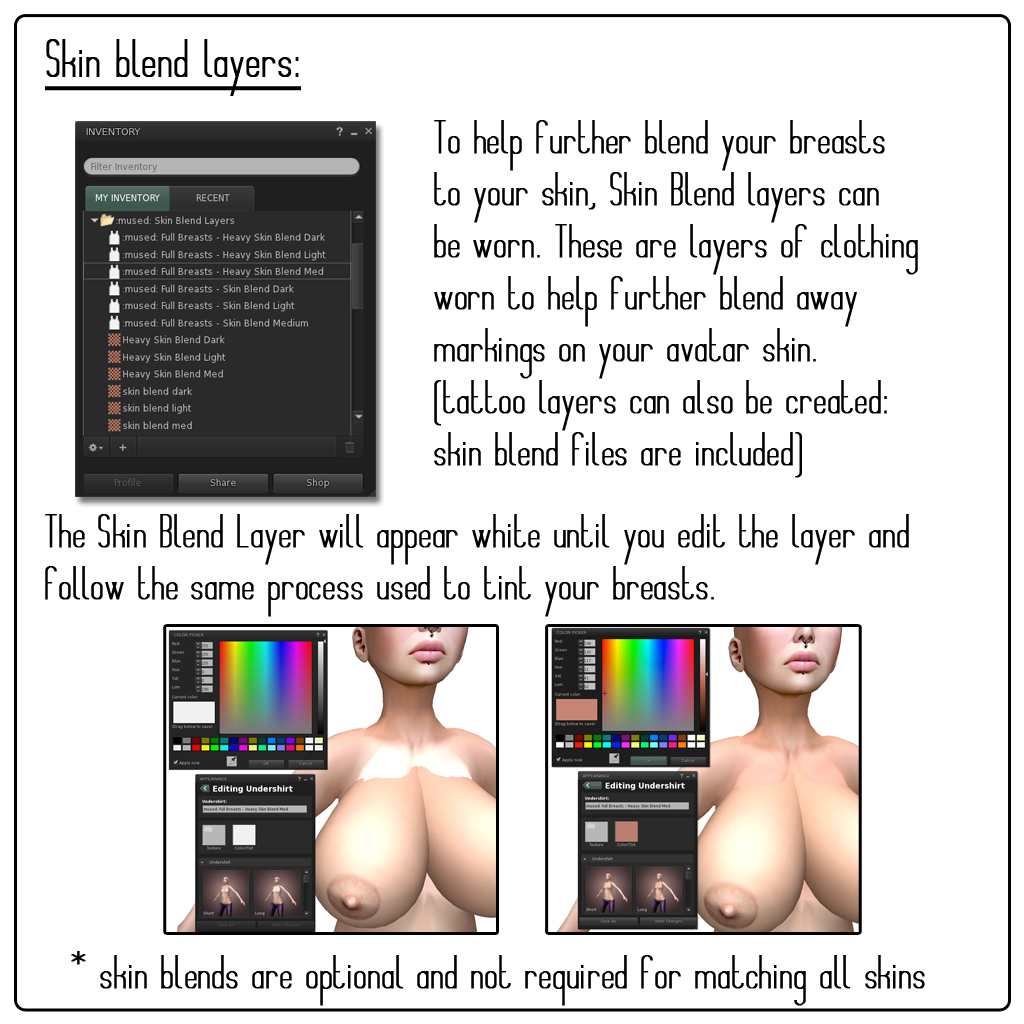
Skin Blend Layers: To help further blend your breasts to your skin, Skin Blend layers can be worn. These are lays of clothing worn to help further blend away markings on your avatar skin. (tattoo layers can also be created: skin blend flies are included) The Skin Blend Layer will appear white until you edit the layer and follow the same process used to tint your breasts. *skin blends are optional and not required for matching all skins. page 14
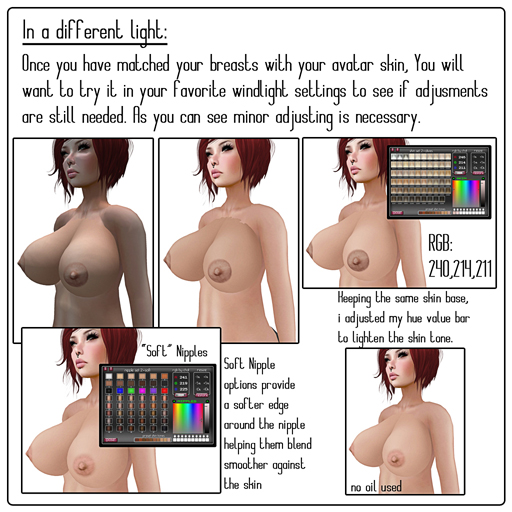
In a different Light: Once you have matched your breasts with your avatar skin, you will want to try it in your favorite windlight setting to see if adjustments are still needed. As you can see minor adjustment is necessary. Keeping the same skin base I adjusted my hue value bar to lighten the skin tone. (Soft Nipple options provide a softer edge around the nipple helping them blend smoother against the skin.)page 15  More light comparison: Lighting will always be something we are struggling with and it will continue to change as SL is developed. It poses quite a challenge to prim breasts wearers but with time and patience you can achieve beautiful results. Windlight settings shown are CalWL WL setting, SL midday, SL Sunrise, SL Sunset. *photos are not editedpage 16
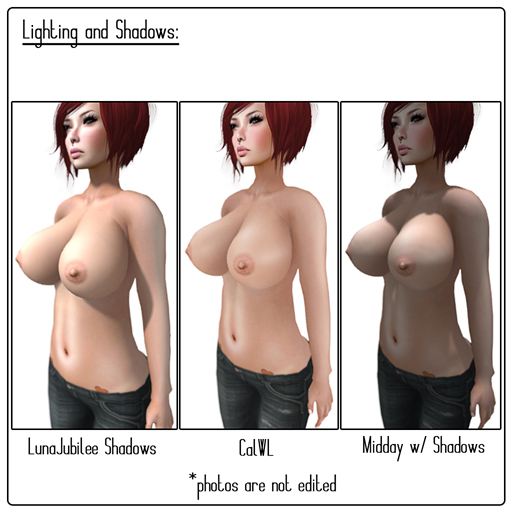
Lighting and Shadows: Windlight settings shown are LunaJubilee Shadows, CalWL, SL Midday with shadows. *photos are not edited

I hope this has been helpful in understanding better how SL handles lighting and why skin matching can be so complicated at times (this is also true for mesh attachments but SL handles light reflection off a mesh object in a way that is much more like how it handles light reflection of the base avatar mesh so the differences are much less noticeable.)

If you have looked through all of this and are still having troubles you may want to consider this personal skin matching.

If you have a furry avatar and are looking for a white fur texture to work from for milkmade breasts IM cali Ciaco for a free applier.

Appliers part 2 skins

This will be part 2 of our coverage of appliers, going over, what they are, how they work and some basic of how to make them. While these posts will hopefully be helpful we can’t support third party work or aid in content creation. You can see the previous post about making clothing appliers here.

An applier for prim or mesh breasts is an object that is scripted to work with the breasts to put or “apply” a texture to a particular part of the breasts. Different brands will use a different script setups to make the applier work so not every applier is compatible with every brand of breast. When it come to skins for prim breasts they are only able to work with skins made specifically for that brand and style. This is not true of all mesh breasts some are inter compatible for skins but for current :mused: breasts only skin appliers made for them will work.

So to start you will need to make a skin texture that will match your skin and wrap correctly on the breast you wish to make it for. To that end we provide textures for you to work from so you know how to shade and wrap your own textures. You can get the skin and nipple textures for full breasts and the developer pack in world in the store next to the full breast vender TP link. The milkmade skin and nipple textures can be downloaded from the website here and the developer pack can be gotten in world above the tank modification kit TP link.

Full Breasts v2

Once you have the texture you wish to use to on the breasts and the developer kit you will need to rez a copy of the applier, edit it and open the _config_1 script.  It will look like this, minus the highlighting. (all images can be viewer larger by clicking them)

 FB_001

You will then need to right click the texture you wish to use and select copy asset UUID.

Now simply highlight and delete COPY&PASTE TEXTURE UUID HERE and paste in your UUID. Make sure the = and ” are still there. So it would look something like “UUID=00000000-0000-0000-0000-000000000000”

And save the script. You should now be able to apply the texture to your breast by clicking the applier object.

(in very rare cases, such as not working from the textures we provide, you might need to adjust the offset, or rotation of the texture to make it look right)

milkmade:

milkmade is a lot like the full breasts but with some slight differences. The first being that the milkmade applier has two configuration scripts to handle two different textures. This is so that your skin does not have to be a mirrored image from one breast to another. Useful for adding a tattoo, or freckles, or spots, or any other variation you might wish to. If you do want to just use one texture for both then there are two ways to do that. You can flip it in your editing software or you can edit the offset in the script which I will explain below. The texture on the website is for the left breast and so we will begin with that one.

Rez a copy of the applier, edit it and open _congfig_skin_left. It will look like this, again without the highlighting.

MM_001

You can now copy the UUDI of your left breast texture by right clicking it and selecting copy asset UUID and pasting it between the quotation marks in the area shown on the image. Make sure the quotation marks are still there and save the script.

Close it and open _config_skin_right. If you are working with two different textures the setup is exactly the same as the left breast. Copy the right breast texture UUID and paste into place, check that quotation marks are still there and save.

If you are working with one texture you will want to paste the left breast UUID here instead and then go down to the section of the script that says vector texture_repeats = and change that first 1.00000 to a -1.00000. (shown highlighted here)MM_003

This will mirror the texture onto the breasts. Make sure the < is still in place right before the negative and save the script. You should now be able to apply the texture to your breast by clicking the applier object.

Remember if you are distributing this applier to set the next owner perms on the scripts to no mod.

Updating milkmade v 1.20 to milkmade v1.30

With the update deadline approaching (July 12th, 2013) I wanted provide a little extra help in updating to those who might want it.

First of all you can use the v1.30 that are in the box and resize and change the appearance if you would prefer rather than updating an older pair of breasts. However if you have one or more that you would rather just update the scripts on instead of resetting up the appearance here is how to do it.

usb update

Step one: wear a pair of milkmade version 1.20 breasts. When you do you should get version 1.30 sent to you. If for some reason you do not you can go to the main store and click the button there or you can file a ticket (more information in original post)

2

Step two: unpack your update box and find me (the  :mused: Milk Made Breast Update (USB) ) and then rez me! You can also wear me if you want to I don’t mind being held. When I am rezed I will give you a script. (It will go into your script folder in your inventory.) This script will let me talk to your breasts and update the rest of the scripts in them.

3

Step three: Rez a copy of the breasts you want to update, but make sure to keep me out! I need to be there to do the updating for you.

4

Step four: Edit the breasts and put the script I gave you into the content window. They will say this in local chat to let you know we are working.

5
:mused: Milk Made Breasts v1.2: @versionnew=918273465
:mused: Milk Made Breasts v1.2: mm_drop_in_breasts_to_start_update mission complete deleting myself

Step five: Sit back and relax while I update the scripts in your breasts I will let you know what I am doing in both my float text and in local chat.

6

:mused: Milk Made Breast Update (USB): Moving scripts
:mused: Milk Made Breasts v1.2: Inactive
:mused: Milk Made Breasts v1.2: **Xcite! Partner v2.0.3 initialized : 7094 bytes free.
:mused: Milk Made Breast Update (USB): Done Updating

Step six: Now I am done! You can see I updated the scripts because I have added the new script for the xcite! features.

7

Step seven: I know a lot of people like to rename their breasts so they know what outfit or avatar they have it set up for so I did not change the name of the breasts but I did change the description so you can leave them as they are or change the name of them so you remember they were updated.

8

Step eight: You can now take your breasts back into your inventory and are done or you can use me to update another pair of the breasts for you!

9

And don’t worry if you don’t get all your breasts updated at once I can help you out whenever you need me to!

Modding Your Pump Tank

In the end of March we released a Full Perm pump tank mod kit. While we don’t provide tutorials on how to mod, or create custom textures or things, and can’t support the work of others, I wanted to go over a few tips and tricks that might be helpful when doing a pump tank mod. The script interacts with the parts of the tank based on their names. This can be used to create similar effects in your tank mods and I will explain what the script does and examples of how it could be used below.

Lights:

On the tank there is a red light when not pumping and a green light when it is pumping. These prims are named “red light” and “green light” Any prim named “red light” will show when not pumping but go transparent when pumping starts, the opposite is true for prims named “green light”

possible uses:

  • A lidded container that shows a copy of the lid hanging to the side while pumping but a lid on top when not.
  • An animated prim showing milk squirting into the tank that shows when pumping but is hidden when not.

Gage:

The prim that changes to display the milk volume in the tank is named “milk gauge prim” The script changes the size of this prim on the Z axis to show filling milk. So any edits made to change the size of that prim on that access will be undone when the tank updates its contents. You can alter the “Slice” of this prim to cut back how large it can go.

possible uses:

  • large milk prim inside a transparent tank
  • made transparent and prim size read by script to change another feature to show milk fullness

Bellows:

The prim that is animated when pumping starts is called “bellows” if the script can’t find a prim labeled “bellows” it will grab another prim to animate, the bellows shape change is hard set in the script and so will resize itself back to original when pumping starts, and the script will only animate one “bellows” prim.

possible uses:

  • Replace bellows prim with one of your own making.
  • make transparent and have script read size changes to create another pumping effect.

So armed with these tid bits of information we want to see what you can do! We are having a Tank Mod-Off! What you need to do to participate is to take an picture or two of your custom pump tank and and upload it to our flickr group for the contest. http://www.flickr.com/groups/musedpumpmod/ The parts do not need to all be made by you, but it does need to be something that is not for sale AS a pump tank mod, So if you took a pre-made back back and made it into a pump tank that is fine.  Include avatar name and a link to a video if you want to show the tank in action. Five favorites will be picked from those submitted and featured in a blog post on June 3rd for voting. The winner of that will get a custom tank exclusively made for this contest from SuperNova Ind. and if I can get one I might have a custom tank mod to give away to one lucky voter in a random drawing so keep an eye out for that!


Appliers part 1 Clothing

Hey musers,

We are going to be covering appliers, what they are, how they work and some basic of how to make them. While these posts will hopefully be helpful we can’t support third party work or aid in content creation.

An applier for prim or mesh breasts is an object that is scripted to work with the breasts to put or “apply” a texture to a particular part of the breasts. Different brands will use a different script set ups to make the applier work so not every applier is compatible with every brand of breast. :mused: breasts both full breasts and milkmade will work with the :mused: appliers that you can get in the developer kits for them, both kits are available in the in world shop. For clothing appliers they also support eCorp, Lolas, iboobs, eboobs, and foxbean. For today’s post we will focus on clothing appliers and  later we will look at skin appliers.

If you have clothing with appliers that you would like to use what you will need to do is set the appropriate layer visible via the breast menu and then wear or rez the applier. Some makers will have you wear the applier and it will auto apply but if that does not work you can rez the applier and click it. If you have just worn a copy of the breasts then it might take a moment for the scripts to start up before the applier can talk to them and pass the texture to be applied. If you want to use the :mused: Applier Adjustment HUD then you should wear it before using the applier so the applier can pass the texture data to both the breasts and the HUD.

Clothing appliers can use two different types of textures. One is just the area of the clothing that would be covering the breasts, like this:Valentine

This gives a much better look as the whole or most of the texture is shown so there is less pixelation or distortion.

The other way to make an applier texture is to use the base shirt texture, like this:valentine shirt

The benefit to this is that you do not need to make a separate texture for the applier. This however does have the down side of only using a very small portion of the texture and resulting in it looking stretched out, fuzzy or pixelated for some textures and will require more work to set up.

To create an applier with your texture you will need to rez a copy of the applier that you got in the developer kit and open the script inside that is called _config_5d. You will see something that looks like this:

Clothing applier UUID

To put your texture into it right click the texture and select “Copy Asset UUID” from the menu. And then paste that UUID into the section of the script that sets the shirt texture it will look something like this “6c0253e0-4d81-78d5-332d-a87a5641df51” and save the script.

If you are using the first type of applier texture that might be all you need to do. If not then you will need to use the applier you have created to apply it to the breasts (and applier adjustment HUD) you can edit the positioning from there with the edit tools directly or with the Applier Adjustment HUD. Once you have gotten the texture positioned the way you want it you will need to take the numbers for color, repeats, offset and rotation. In most cases the color and rotation will be unchanged.Clothing applier texture

In the edit window you will see Repeats per face Horizontal (U) and Vertical (V) the same for texture offset. These are put into the script as a three number set the third will always be 0.000000 where the first is your horizontal or U and the second is your vertical or V.

If you were using the :mused: Applier Adjustment HUD you can have it “show settings in chat history” and get your numbers from there.

After you have saved the script with the updated positioning for the texture use the applier again to be sure that everything looks right and if not make any changed you need to make in the same way. Once you are satisfied with the placement of the texture change the name of the applier object so you will know what outfit it is for and take it back into your inventory.

If you are using the applier to tint the texture you will need to convert the RGB numbers into RGB vector format this can be done by dividing the RGB number by 255 so that a purple which is 156, 91, 196 would be 0.61, 0.36, 0.77.  With white being 1.0, 1.0, 1.0 and black being 0.0, 0.0, 0.0.

Rotation is in radians rather than degrees and so it can’t be taken direct from the edit widow output. I would highly recommend using the Applier Adjustment HUD to get this number. Or you can do a google conversion search of degrees to radians.

In the next part of this series we will discuss skin appliers.